

Creating project
We will use Expo CLI. This tool greatly facilitates the process of developing. Open the terminal and run the following commands:
# Install Expo CLI
npm install -g expo-cli

# Initialize new project
expo init mapchat

# Go to project directory
cd mapchat

# Run the application
expo start
At this point in the mapchat directory we have a sample application structure, which is ready to run in a simulator or a real device using the Expo Client app.
Installing other dependencies
To build the application we will also need:
- react-native-maps - to display map and markers with messages,
- expo-location - to fetch the current location of a device,
- firebase - to write and read messages from the Firebase Realtime Database,
- moment - for easy date formatting.
Displaying the map
First, create a src/helpers/map.js file containing a helper function that returns an object with the data of the displayed region in the structure required by the react-native-maps package:
// src/helpers/map.js

export function getRegion(latitude, longitude, distance) {
    const oneDegreeOfLatitudeInMeters = 111.32 * 1000;

    const latitudeDelta = distance / oneDegreeOfLatitudeInMeters;
    const longitudeDelta = distance / (oneDegreeOfLatitudeInMeters * Math.cos(latitude * (Math.PI / 180)));

    return {
        latitude,
        longitude,
        latitudeDelta,
        longitudeDelta
    }
};
This function calculates the latitudeDelta and longitudeDelta values based on the given geographical coordinates and distance (in meters), which we will use to control the map zoom.
Open the existing App.js file and replace existing code with the following:
// App.js
import React, { Component } from 'react';
import { StyleSheet, View, Text } from 'react-native';
import MapView from 'react-native-maps';
import { getRegion } from './src/helpers/map';
export default class App extends Component {
state = {}
componentDidMount() {}
onChangeText() {}
onSendPress() {}
getLocation = async () => {}
render() {
return (
<View style={styles.container}>
<MapView
ref={(ref) => this.map = ref}
style={styles.map}
initialRegion={getRegion(48.860831, 2.341129, 160000)}
/>
</View>
);
}
}
const styles = StyleSheet.create({
container: {
flex: 1,
backgroundColor: '#fff',
alignItems: 'center',
justifyContent: 'center'
},
map: {
...StyleSheet.absoluteFillObject
}
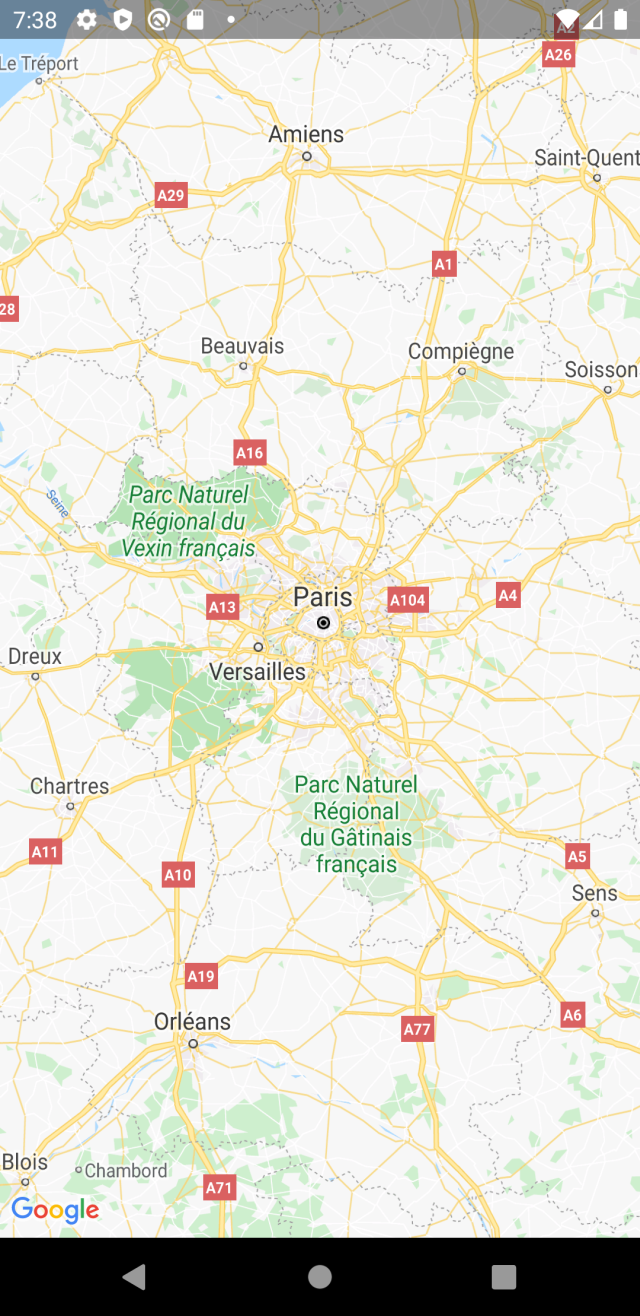
});In the code above, we have imported components we need at this moment, and then inside the App class we have declared app state and methods, which are currently empty but will be explained and filled with the code later. Next, we render the MapView component and set the object returned by our getRegion() helper function to the initialRegion prop. In addition, by using the ref prop we created a reference to the map, so that we can refer to it at later stages from other places in the code.
Calling the getRegion(48.860831, 2.341129, 160000) function (Paris coords included here as an example) returns the following object:
Object {
  "latitude": 48.860831,
  "latitudeDelta": 1.437297879985627,
  "longitude": 2.341129,
  "longitudeDelta": 2.1847076799791414,
}
To zoom in/out the map, simply change the third parameter (distance), which will calculate new latitudeDelta and longitudeDelta values on which the zoom level depends.
Also note that we have passed the style prop to the MapView component with rules to expand the container to maximum width and height of the screen (StyleSheet.absoluteFill is the faster equivalent for position: 'absolute', left: 0, right: 0, top: 0, bottom: 0). Not setting the container size is one of the most common problems with displaying the map.
Getting the device location
We need the location to be saved in the database together with the messages sent by the user in order to display a marker in the right place of the map. Also, it will be useful for changing the default display region of the map to a region near the user. We will get it using the previously installed expo-location package.
Add at the top of the App.js file:
// App.js

(...)
import * as Location from 'expo-location';
import * as Permissions from 'expo-permissions';
(...)
Then, inside the App class, define the default application state in which location will be stored:
// App.js

(...)
  state = {
    location: {
      latitude: null,
      longitude: null
    }
  }
(...)
Further, in the same file, fill in the empty getLocation method with following code:
// App.js

(...)
  getLocation = async () => {
    let { status } = await Permissions.askAsync(Permissions.LOCATION);

    if (status === 'granted') {
      let location = await Location.getCurrentPositionAsync({});

      this.setState({
        location: {
          latitude: location.coords.latitude,
          longitude: location.coords.longitude
        }
      });

      this.map.animateToRegion(getRegion(location.coords.latitude, location.coords.longitude, 16000));
    }
  }
(...)
Calling this method will ask for permission to access the device location. If permission is granted, the location is saved in the application state. Then, using the map reference, we call animateToRegion() method, causing the map to scroll smoothly to your location.
We would like this method to be called immediately after starting the application, so let's call it in the componentDidMount method:
// App.js

(...)
  componentDidMount() {
    this.getLocation();
  }
(...)
Firebase configuration
Create a file src/config/firebase.js with the following content:
// src/config/firebase.js

import * as firebase from 'firebase';

const firebaseConfig = {
    apiKey: "",
    authDomain: "",
    databaseURL: "",
    projectId: "",
    storageBucket: "",
    messagingSenderId: "",
    appId: ""
};

firebase.initializeApp(firebaseConfig);

export default firebase;
Then log in to Firebase Console, create a new project, go to Project settings > Firebase SDK snippet > Config and copy the configuration details to the firebaseConfig constant in the above file.
Now we have to import firebase in the App.js file:
// App.js

(...)
import firebase from './src/firebase';
(...)
Creating a text field for a message
To do this, we use the TextInput component from react-native for the message body and the TochableOpacity component which will be our button responsible for sending it. The button will also contain an icon from the Expo library (check full icon list here).
So let's modify the import statement as shown below:
// App.js

(...)
import { TextInput, TouchableOpacity, ToastAndroid, StatusBar, Keyboard, StyleSheet, View, Text } from 'react-native';
import { MaterialIcons } from '@expo/vector-icons';
(...)
We also import:
ToastAndroid- to display a toast message after sending the message,StatusBar- will help us get the current status bar height to calculate the distance between text input and the top of the screen,Keyboard- will allow us to use theKeyboard.dismiss()method to hide the keyboard after sending the message.
Add new fields to the application state:
// App.js

(...)
  state = {
    (...)
    messageText: null,
    sendButtonActive: false
  }
(...)messageText- here we will store the value entered into the text input,sendButtonActive- this value will be used to determine if the send button should be active and allow you to send the message or not.
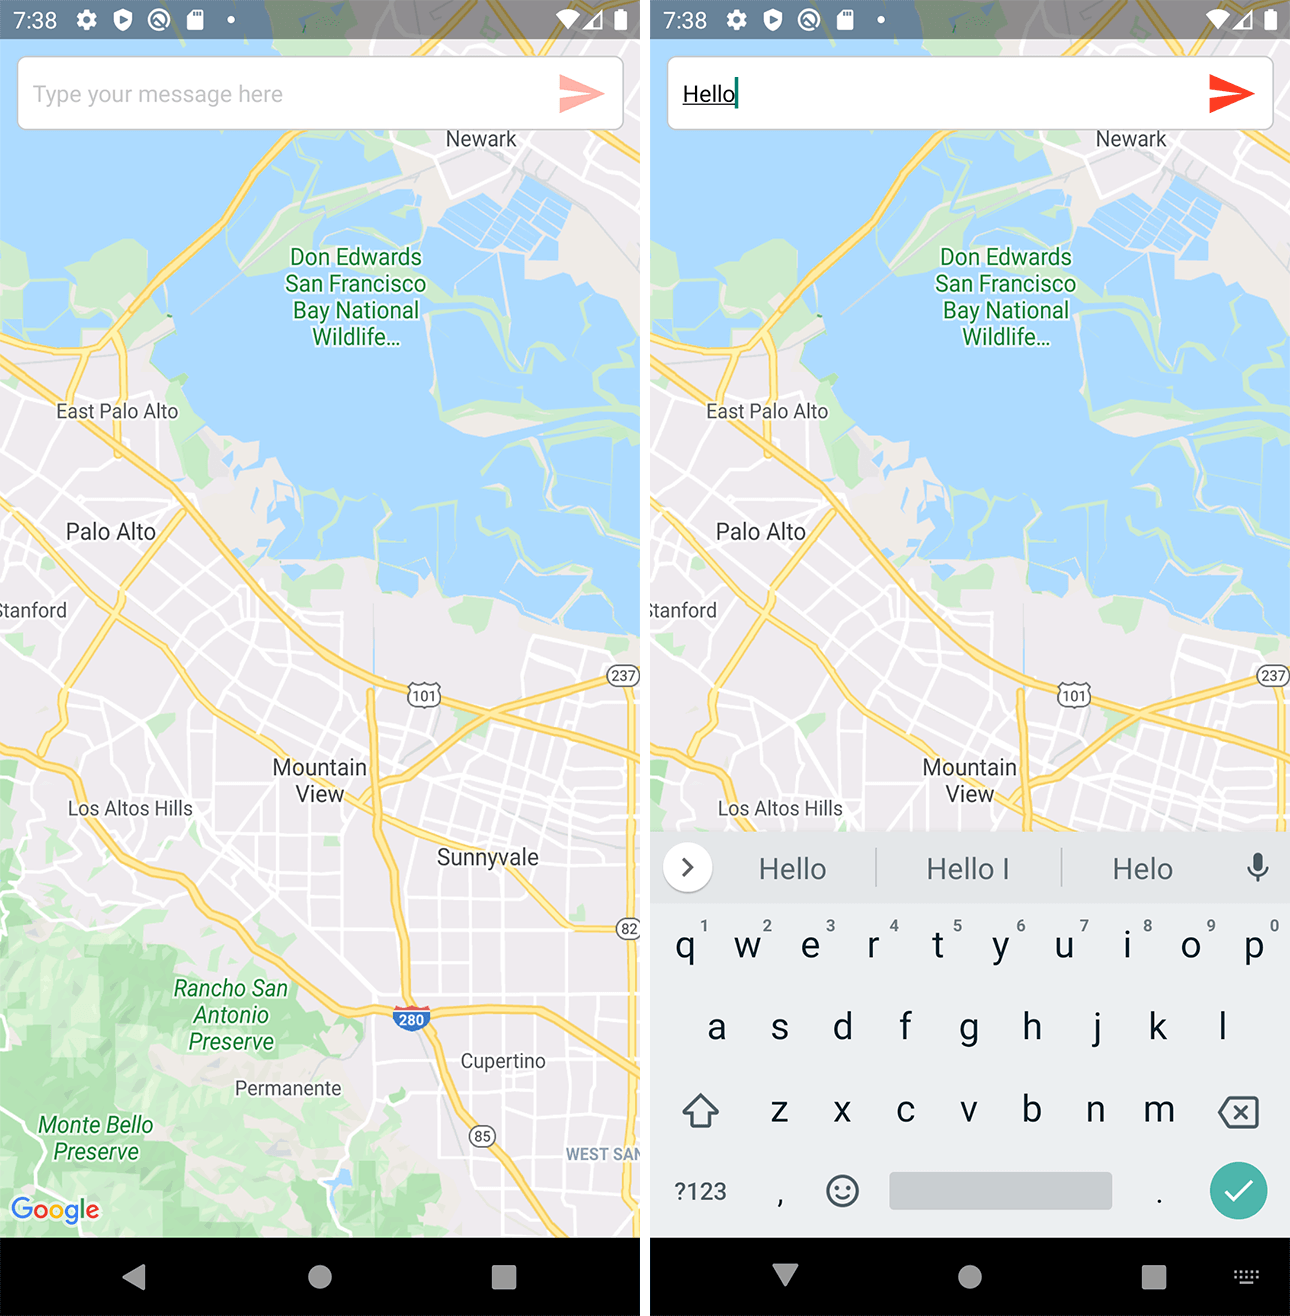
Then display TextInput in the render() method:
// App.js

(...)
  render() {
    return (
      <View style={styles.container}>
        <View style={styles.inputWrapper}>
          <TextInput
            style={styles.input}
            placeholder="Type your message here"
            onChangeText={messageText => this.onChangeText(messageText)}
            value={this.state.messageText}
          />
          <View style={{ ...styles.sendButton, ...(this.state.sendButtonActive ? styles.sendButtonActive : {}) }}>
            <TouchableOpacity onPress={this.onSendPress.bind(this)}>
              <MaterialIcons name="send" size={32} color="#fe4027" />
            </TouchableOpacity>
          </View>
        </View>
        <MapView>(...)</MapView>
      </View>
    );
  }
(...)
We will also need to add some styles:
// App.js

(...)
const styles = StyleSheet.create({
  (...)
  inputWrapper: {
    width: '100%',
    position: 'absolute',
    padding: 10,
    top: StatusBar.currentHeight,
    left: 0,
    zIndex: 100
  },
  input: {
    height: 46,
    paddingVertical: 10,
    paddingRight: 50,
    paddingLeft: 10,
    borderColor: 'gray',
    borderWidth: 1,
    borderRadius: 6,
    borderColor: '#ccc',
    backgroundColor: '#fff'
  },
  sendButton: {
    position: 'absolute',
    top: 17,
    right: 20,
    opacity: 0.4
  },
  sendButtonActive: {
    opacity: 1
  }
});
Sending the message
Our TextInput component already calls the onChangeText method every time the user changes the input's value and passes the current value to it. Let's fill this currently empty method with the code, which will modify our application state accordingly. Additionally it will also decide whether the send button should be active (if at least one character is entered).
// App.js

(...)
   onChangeText(messageText) {
    this.setState({
      messageText: messageText,
      sendButtonActive: messageText.length > 0
    });
  }
(...)
Next, we have to handle the button press event that calls the onSendPress method, which will send the message to Firebase Realtime Database.
// App.js
(...)
onSendPress() {
if (this.state.sendButtonActive) {
firebase.database().ref('messages').push({
text: this.state.messageText,
latitude: this.state.location.latitude,
longitude: this.state.location.longitude,
timestamp: firebase.database.ServerValue.TIMESTAMP
}).then(() => {
this.setState({ messageText: null });
ToastAndroid.show('Your message has been sent!', ToastAndroid.SHORT);
Keyboard.dismiss();
}).catch((error) => {
console.log(error);
});
}
}
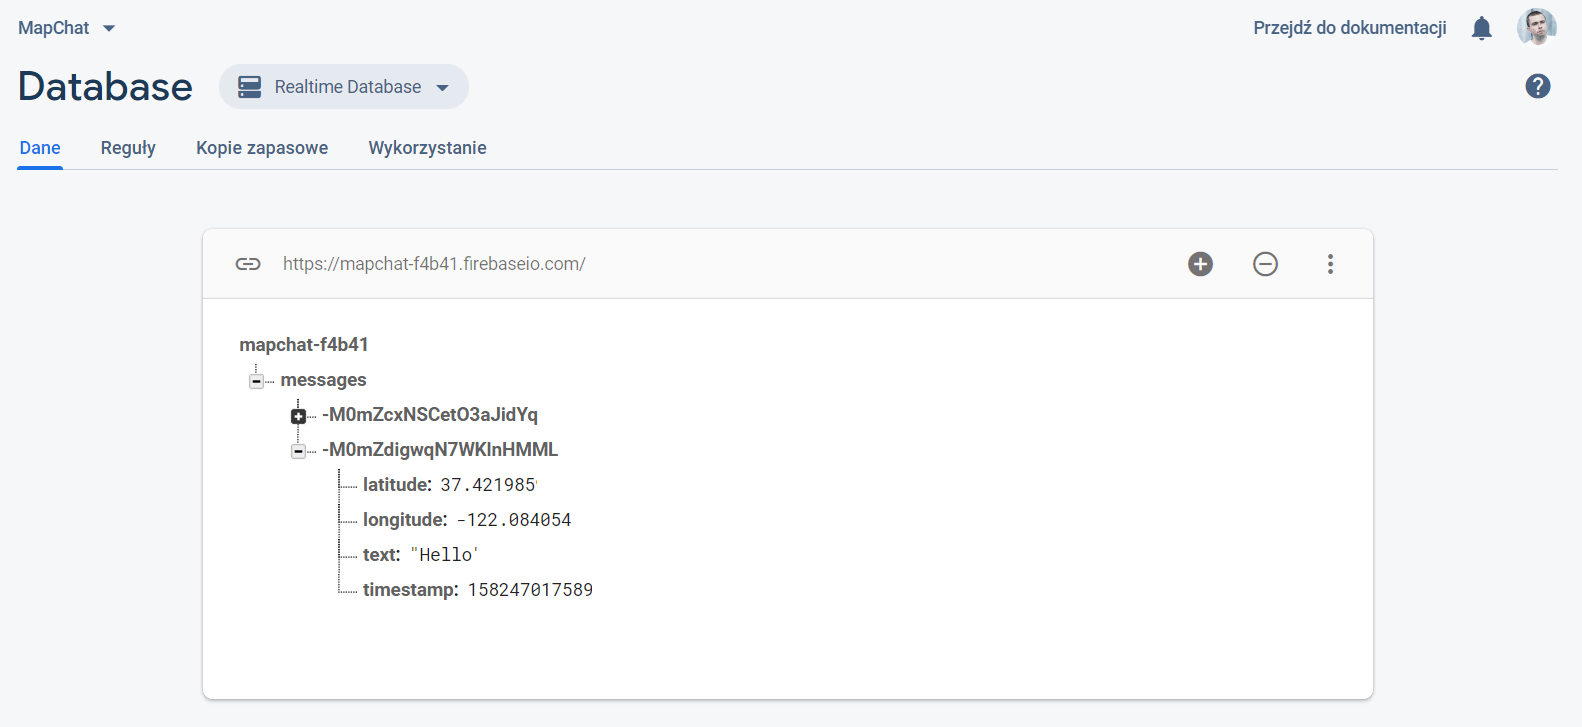
(...)As you can see in the code above, we are also sending coordinates (latitude, longitude) and the timestamp returned by the Firebase server at which the message was created.
If everything has been done correctly, in the Firebase console you will be able see the messages sent in real time.
Displaying markers and messages
To display the marker, we will use the Marker component from react-native-maps package. Above it, we will render the Callout component with the message text. Let's import them:
// App.js

(...)
import MapView, { Marker, Callout } from 'react-native-maps';
import moment from 'moment';
(...)
We also imported the moment.js library that was installed earlier, it will allow us to convert the timestamp a message was created into human-readable format ("added X minutes ago").
Add empty messages array to the default app state, where messages from Firebase will be stored:
// App.js

(...)
   state = {
    (...)
    messages: []
  };
(...)
Now we have to fetch the messages from the Firebase. The right place for it is the componentDidMount() method:
// App.js
(...)
componentDidMount() {
this.getLocationAsync();
firebase.database().ref('messages').limitToLast(10).on('child_added', (data) => {
let messages = [...this.state.messages, data.val()];
this.setState({ messages }, () => {
let { latitude, longitude } = [...messages].pop();
this.map.animateToRegion(getRegion(latitude, longitude, 16000));
if (this.marker !== undefined) {
setTimeout(() => {
this.marker.showCallout();
}, 100);
}
});
});
}
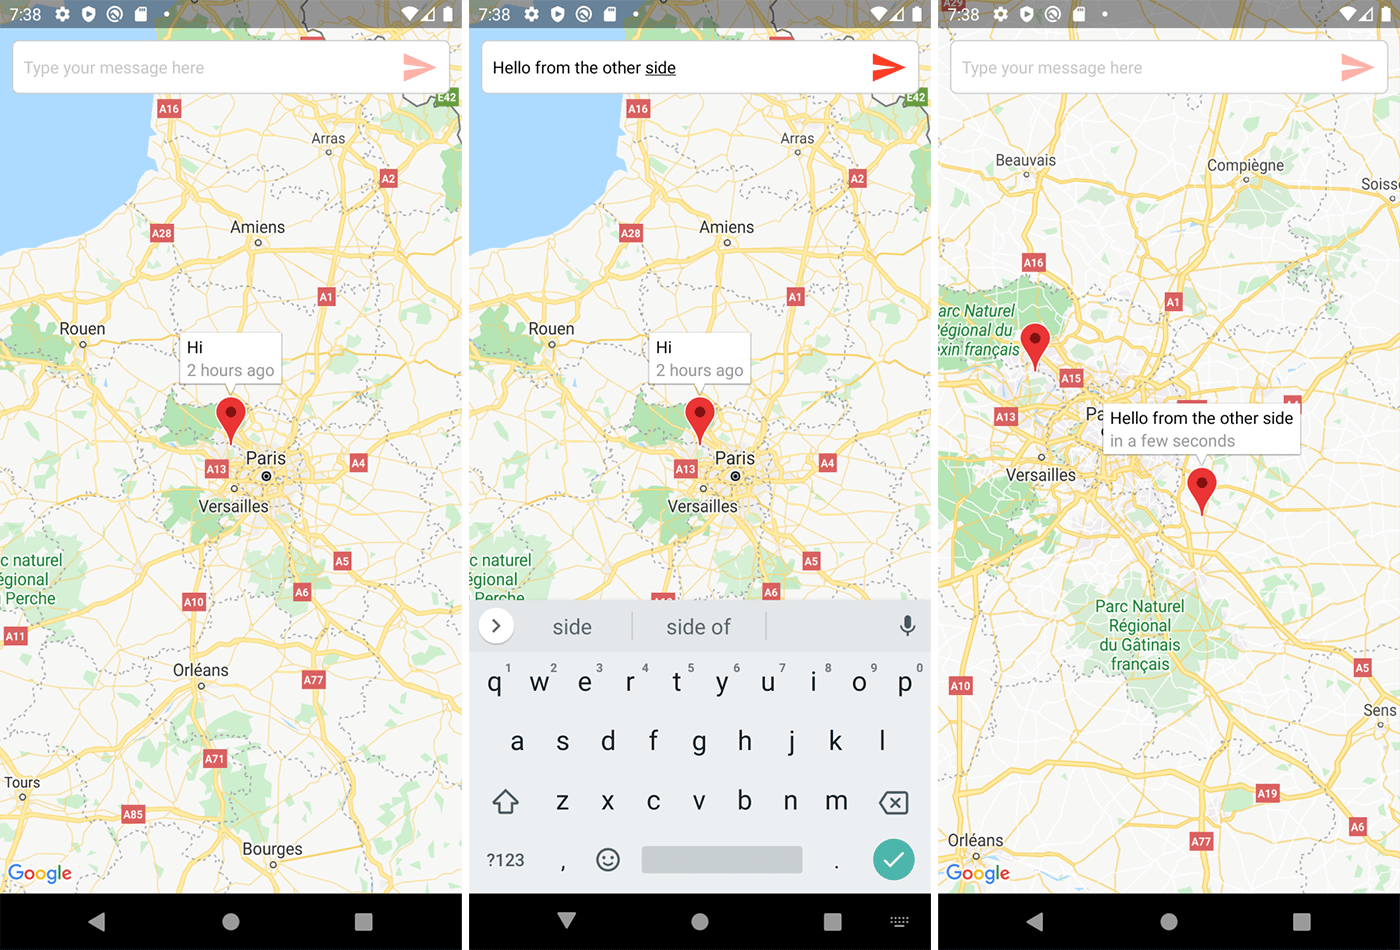
(...)The code above will fetch the latest 10 messages and then listens to the child_added event, which will be called each time a new message is added. During each such event, the messages array in the application state is updated with new messages. Then the map is scrolled to the location from the latest message, and using the reference to the most recently added marker (which we will create in a moment), the showCallout() method is called on it to display the message text.
Now add the Marker and Callout components to the render() method:
// App.js

(...)
  render() {
    return (
      (...)
        <MapView
          ref={(ref) => this.map = ref}
          style={styles.map}
          initialRegion={getRegion(48.860831, 2.341129, 160000)}
        >
          {this.state.messages.map((message, index) => {
            let { latitude, longitude, text, timestamp } = message;

            return (
              <Marker
                ref={(ref) => this.marker = ref}
                key={index}
                identifier={'marker_' + index}
                coordinate={{ latitude, longitude }}
              >
                <Callout>
                  <View>
                    <Text>{text}</Text>
                    <Text style={{'color': '#999'}}>{moment(timestamp).fromNow()}</Text>
                  </View>
                </Callout>
              </Marker>
            )
          })}
        </MapView>
      </View>
    );
  }
(...)
And that's all! New messages are displayed on the map.
The ready-to-run code from this tutorial is available on GitHub.
Exercises for you
- Assign each user (device) a different marker color on the map.
- Handle the denial of access to the device location by displaying the appropriate message.
- Add option for the users allowing them to disable automatic map scroll to the new markers.