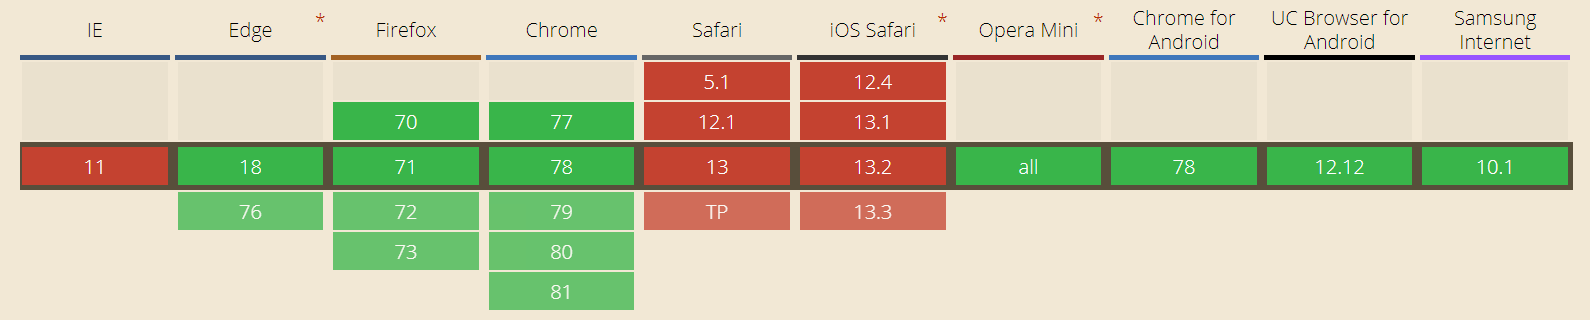
In December 2019, as we can see at caniuse.com, many browsers still do not support WebP format (including all versions of Internet Explorer and Safari):
For this reason, we need to make sure that WebP images are only sent to browsers that support it and we will achieve this at the webserver level.
Install WebP
On a Debian/Ubuntu system execute the following command:
sudo apt-get install cwebpYou can also download the libwebp-1.0.3.tar.gz package from here and compile it from sources:
tar zxf libwebp-1.0.3.tar.gz
cd libwebp-1.0.3
./configure
make
sudo make install
This will install cwebp which will allow you to convert graphic files.
Convert the files
On a typical website, new graphics are constantly arriving (uploaded by CMS, automatically generated thumbnails, etc.), so it would be wise to prepare a bash script, that will be executed by the cron daemon and will recursively search and convert all newly created .jpg/.jpeg/.png files to .webp in all subdirectories and place them next to the original ones.
Create a file called convert_to_webp.sh with the following content:
#!/bin/bash

OLD_IFS=$IFS
IFS=$(echo -en "\n\b")

for FILE in `find /var/www/example.com/public/ -iregex '.*\.\(jpg\|gif\|png\|jpeg\)$'`
    do
        if [ ! -f "${FILE}.webp" ]; then
            cwebp -quiet -q 80 ${FILE} -o ${FILE}.webp;
            echo "Converted ${FILE} to ${FILE}.webp"
        fi
done

IFS=$OLD_IFS
Adjust the path /var/www/example.com/public/ to point to the directory, where the files to be converted are located, then give the script execution rights:
chmod +x convert_to_webp.shand run:
./convert_to_webp.shIf everything was done correctly and there were files to convert in the directory, you will see a similar result:
/var/www/example.com/public/photo.jpg has been converted to /var/www/example.com/public/photo.jpg.webp
/var/www/example.com/public/logo.png has been converted to /var/www/example.com/public/logo.png.webp
/var/www/example.com/public/subfolder/background.png has been converted to /var/www/example.com/public/subfolder/background.png.webp
Now the WebP equivalents of the original files are saved next to them. It is worth mentioning, that re-running the script will not convert the same files again. So even with a large number of images you can add the script to cron to convert a new files when they appear without any fear.
To set up a cron job to run the script every 30 minutes, execute the crontab -e command and add the following line:
*/30 * * * * /path/to/the/script/convert_to_webp.shHow to configure NGINX to serve WebP images
In the main config file (which is usually located in /etc/nginx/nginx.conf) add the following lines in the http {} section:
map $http_accept $webp_suffix {
    default   "";
    "~*webp"  ".webp";
}
Then in the server {} section of your vhost add the following directive:
location ~* ^.+\.(png|jpe?g) {
    add_header Cache-Control "public, no-transform";
    add_header Vary "Accept,Accept-Encoding";
    try_files $uri$webp_suffix $uri =404;
    expires 30d;
}
This will cause any browser that sends image/webp MIME type in the Accept header along with the HTTP request, to fetch the WebP version of the image if it exists.
Finally, restart NGINX to apply the changes:
/etc/init.d/nginx restartConfigure Apache to serve WebP images
Add following directives to your .htaccess file:
<IfModule mod_rewrite.c>
  RewriteEngine On

  # Check if request is for an image
  RewriteCond %{REQUEST_URI} \.(png|jpe?g)$

  # Check if browser supports WebP
  RewriteCond %{HTTP_ACCEPT} image/webp

  # Check if .webp file exists
  RewriteCond %{DOCUMENT_ROOT}/$1.webp -f

  # Return .webp file
  RewriteRule (.+)$ $1.webp [T=image/webp]
</IfModule>

<IfModule mod_setenvif.c>
  # Create REQUEST_IS_IMAGE variable for image files
  SetEnvIf Request_URI "\.(png|jpe?g)$" REQUEST_IS_IMAGE
</IfModule>

<IfModule mod_headers.c>
  # Add the Vary header to the response of the image request,
  # saying that the content at this URL may differ depending
  # on whether browser supports WebP or not
  Header set Vary "Accept,Accept-Encoding" env=REQUEST_IS_IMAGE
</IfModule>

<IfModule mod_mime.c>
  AddType image/webp .webp
</IfModule>
Verify that it works
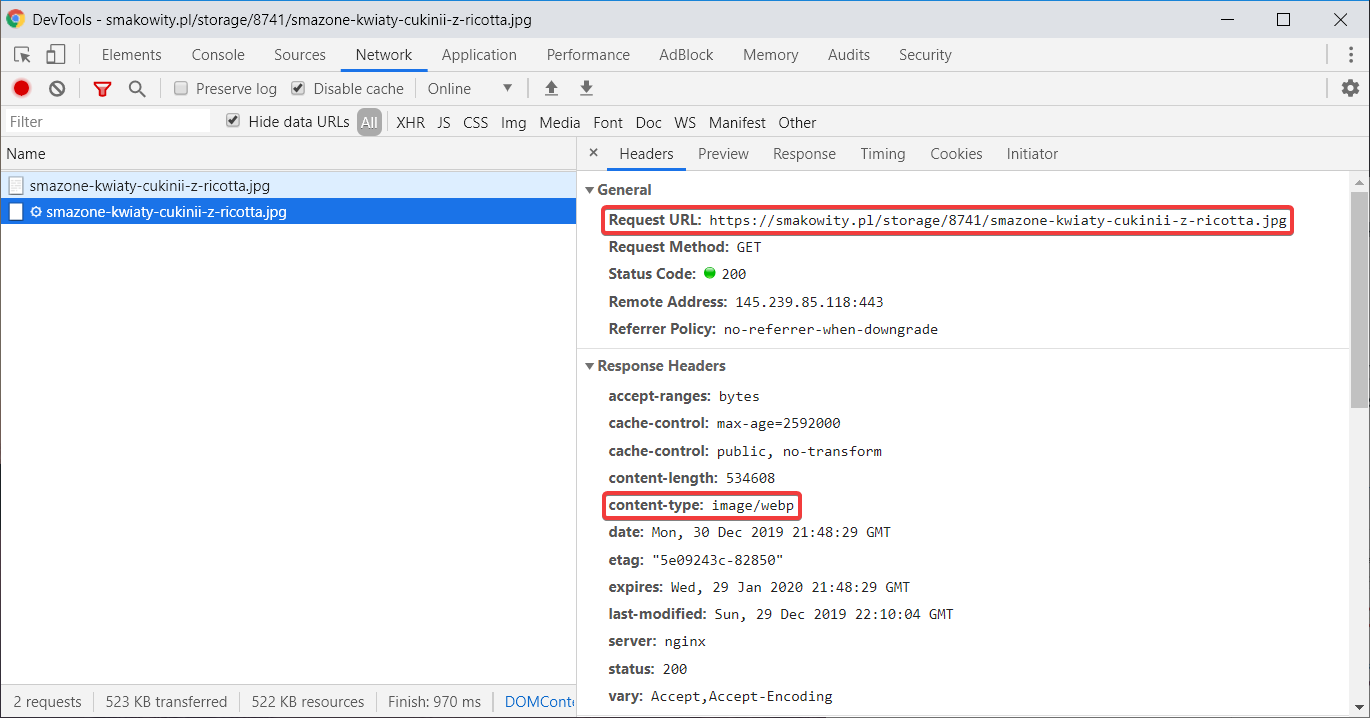
You can use Chrome DevTools for this. If everything has been done correctly, you will see the Content-Type header with the image/webp value in the "Response Headers" section: